The Session;
At the start of the session we went onto illustrator to make the rest of our buttons for our website so that we are able to put them into our website;
Doing this allows us to set up the next button, to so this go the insert button, then image, then rollover image, then this box comes up.
Applying rollover buttons;
Making sure the information is filled out correctly for work button.
This is what it looks like when live.
Making sure all the information is filled in correctly for about button.
This is what it looks like when live.
Make sure all the information is filled in correctly for contact.
This is what it looks like live.
Testing the website after doing this coding is important as it allows you to see if it has worked before you move on to the next thing. I found that all my buttons work, so that when you hover over a button it will go from helvetica neue to helvetica neue bold italic.
This is what the coding looks like for the four buttons.
I decided that the colours I used ar vile and needed to change them, therefore I went with the top colours, I then realised that the top version meant that I couldn't see the type very well, therefore I changed it again to make it lighter so that you can see the writing.
This is the bit in the button which links to another page, # means that it is linking nowhere, therefore we need to change this.
Changing the # to index.html means that it will link with my home page when I make it, and apply it to all the rest of them for example <a href="contact".
Save each of the type on the page as different pages, changing it from 'This is the home page.' to 'This is the about page.' then going to save as, so you can save as the name that you put in the green <a href="about.html" field, this will link you pages together.
This is showing my website is working and all the links are working.
Content;
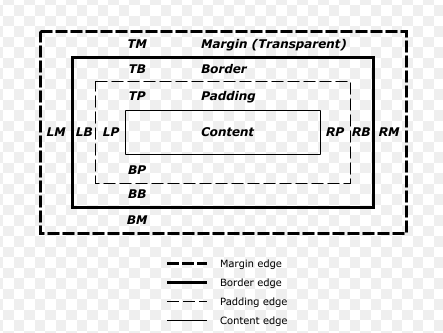
This is a box model. When thinking about the measurements of the content box in the div id, make sure you consider the space you have, for example I have 824px left in width, therefore if I want to make a content box I will need to consider taking away the space I need for padding, for example if I want 20px padding at each side, I need to take that away from 824px.
824 - 20 - 20 = 784px width
768 - 20 - 20 = 728px length
With 20px padding the content box would have to be 784px by 728px.
If we wanted two columns rather than one large area, as we would want for example a gutter in between the columns to be 20px, therefore the columns would specicy;
Left;
padding - top 20px - bottom 20px - left 20px - right 10px
Right;
padding - top 20px - bottom 20px - left 10px - right 20px
382px width each by 728px length each.
Creating two columns on the website;
This is the the spreadsheet.
This is the source code.
This is what the website looks like, this is it with two columns, I have made them different colours so that they are easier to see and see if they work.
Inserting text;
Inserting just a Lorem Ipsum text into the first column, to do this I entered the text in the source code under the left column.
even though on the source doe there is a return space, it doesn't show on the website when you check therefore you need to add a paragraph insert, <p>.
This shows the text with the paragraph inserted.
I don't need the coloured boxes anymore, therefore I can get rid of the background colour on both left and right columns. Although I found that the text it quite hard to see, therefore I need to change the colour of the text.
I changed the colour of my text to white to make it more visible.
To do this just go onto the spreadsheet and go to where the font is, and change the colour.
To make the 'This is the home page.' italic and larger you go to the spreadsheet and creating a heading bracket, then go to source code and apply it in there, open the <h1> before the type and close the </h1> after what I want to be italic and larger.
This shows you the working page when it is italic and larger.
Inserting a video;
Use vimeo to inset the video, upload your own video onto it and you can change the size of the pixels so that it will fit it the space you have, also find the colour you want and your embed code should be there, this is the code you inset into your source code, wherever you want to place it.
Inserting an image;
Get your image and upload it into Photoshop, then save to web as a Jpeg, and put the quality to as little as possible without losing the image.
Insert image into where you want it on your website, for mine I have put it into my right column.
This is what it looks like when you view it.


No comments:
Post a Comment