Initial stages;
First getting the brief for typogateaux, lots of different ideas came to mind about what I should do, then I decided to team up with Melissa. We both looked individually at different ideas then brought our ideas together to see what we could make.
Design sheets;
My first ideas were to create a teared cake, looking into type exploding from it, like a volcano, maybe using popping candy to increase the effect when its being eaten. But then I wanted it to not only include typography but have a graphic design context to it. So I then looked at favourite fonts and typefaces, having most popular on to, down to average, then the bad. But then I thought that it would a judgement call, as some people like using rubbish fonts.
Then started to look at cake pops, as I found that it hadn't been done before in the brief typogateaux. This would make our entry unique, therefore me and Melissa decided that producing cake pops would work well for us, also to make it typogateaux we wanted to make the cake pops letters. I then looked at different ways which we could decorate them, for example; stripey, spotty, christmasy or plain.
Thinking about different way to display the cake pops was the main concern as when they have been produced they can't simple remain uncovered and just on a surface. Therefore I thought about polystyrene blocks to stand them in, also looked at placing then in a cake. As long as the cake and the cake pops kept to the same theme this would work well.
As it is close to christmas, I thought that it could be a good idea to do a christmas themed cake, although after speaking to Melissa about the decorations and theme we should use, we decided to go with a girly pink and white theme, and thought to use spots.
The final idea;
Also after researching how to make cake pops we found that we could use little cases for them, then they can be transported into college, also we could just place them around the cake as the are quite heavy, and the cake/polystyrene may not hold them all.
Making the cake/cake pops;
 |
| Making the mixture |
 |
| Decorations |
 |
| Choice of tine sizes |
 |
| Ready to bake, two tears and extra for cake pops. |
 |
| Cake for the cake pops. |
 |
| Crumbling the cake. |
 |
| Ready to add the frosting to the crumbled cake. |
Start forming letter keeping the letter in the space of 5cm by 7cm, and a depth of 1,5cm to keep them all consistant. Also the stick need to be able to stay in the cake pops, this requires us to have a certain depth.
 |
| A |
Thinking about counters, we could have cut them out but the candy melt, which goes around the outside, will cover it up anyway and it will have less of a structure and may fall apart easier, therefore we decided that this will make our typeface individual as we won't have counters.
 |
| B |
 |
| Cake half crumbled for the cake pops. |
 |
| ABCDEF |
 |
| Melissa cutting out the H. |
 |
| Almost a full alphabet. |
 |
| Dipping |
We had difficulties when putting in the sticks as some of the cake pops that had been made first were slightly harder to get in as it crumbled. To get the sticks to stay in the pop we had to put some of the melted candy melts into bowl and dip the sticks into them then immediatly put them into the cake, then freeze them so that they stay in place.
 |
| Ready to freeze. |
 |
| The base |
The base for the cake was made with the same vanilla sponge as the cake pop, also we thought about making layers but it may have looked slightly off therefore we made it like a giant butterfly cake. Cutting the top off the cake and putting the same frosting into the cake and some jam, then putting the top back of, and coated it with icing.
 |
| Freezing. |
 |
| Cake pops |
We decided to make some normal cake pops as well as when we were putting the letters on their sticks some of them were cracking and looked a bit week. We thought that putting them in the freezer will make them harder and keep them in place until they get coated. But just in case we decided to make some normal cake pops because we thought that this could be our back ups, also we had some left over cake pop mixed. With the remainder of the cake pop we had mixed, we decided to make some glyphs such as ? ! / 1.
 |
| Top layer of cake before iced. |
 |
| Iced and placed on top. |
With the tears after placing the top cake on, it showed lines, marks and didn't look very professional, therefore we decided to ice the gap in pink, which was harder than we initially thought it would be. Although the icing doesn't look like it has been done very well it all looks the same, therefore keeping it consistant on the bottom and the top.
 |
| Making the spots. |
 |
| Icing the letters. |
When icing the letter we decided to do two layers because they were very delicate therefore doing the first coat and then letting them set meant that on the second coat we could be a bit rougher, to get more on. We used the polystyrene to keep the letter up and make sure they don't touch each other or stick to each other.
We different sized circle stencils and cut them out for the cake and the letter. Although this took a long time as we should have found some circle cutters or something, as they weren't very well crafted circles, although Melissa found a way of disguising the jagged edges so it didn't look as rough. Also as the letters were small the circles had to be even smaller therefore we used a straw as a cutter, and it make the process a lot quicker.
 |
| Sticking the spots on the cake. |
 |
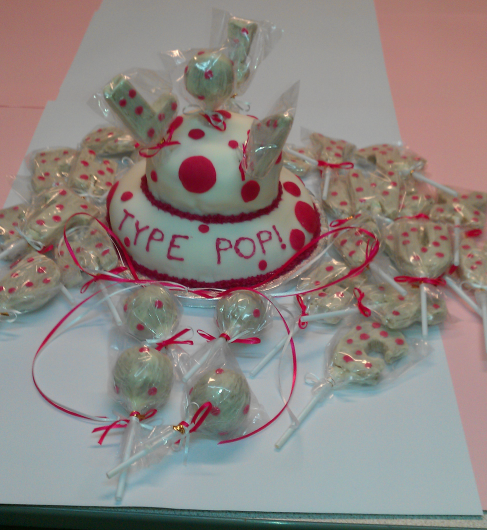
| Type pop packaged. |
When packaging the letters we had to be really careful not to pull the sticks out of the letters. We put the gold tags on first, this kept the packaging in place, then cut them down so that the gold wasn't visible. We then put pink and white bows on top of the gold to cover it and make it look aesthetically pleasing, also keep it with the same theme. We underestimated how much ribbon we would need as the plan was to have both pink and white ribbon on both, but we didn't have enough therefore we used alternate, and on the cake pops we used both.
 |
| Final cake |
Choosing the name for our typeface took a long time, we thought about it all the way through making the cakes. It was only right at the end where we thought of type pop, as we thought it is simple and to the point. Putting the name of our typeface on the cake links the cake to the letters, just in case the letter don't stick in the cake very well.
 |
| Finished type pop. |
 |
| Presentation |
Presenting the type pop on the cake we found hard as the letters are really heavy therefore putting them in the cake at an angle was hard and they started to slightly fall down, therefore we shoved them really far in so that they can't fall. The initial idea was to use LCA in the cake but unfortunately the C suffered on the ice on the way in and was really weak, and was at a risk of breaking therefore we didn't want to temp fate. Although we put the '!' in instead and it looked good and worked well, also positioning the letters around the cake worked well too.
 |
| Trophy |
Typogateaux went really well as me and Melissa won, and this is the trophy that we got for it.
Evaluation;
Me and Melissa worked really well as a team, we both did individual research then brought it together to get a broad range of information for our project. It worked really well even though we thought half way through that it might fail because of the structure of the letters.
If we were to do this again, we would probably have made the letter a little bit thicker so that they have more depth to put the stick in, this would make the letters more sturdy. This would have made the process easier as on some of the letters, they fell apart and had to make them again, which made the process longer, therefore this would cut out a large chunk of time. We would also have thought about how to cut out the circles from the icing, maybe getting circle cutters, this would have made our lines sharper.
If we had more time we could have made the cake bigger, we could have had more tears to it, and spell out the 'Type pop' in the type pop. We could have also made more glyphs, as in the end we only had two as two of them broke when we were trying to coat them, as we used them as tester just in case they went wrong as they weren't as important as the rest.
Overall I think that it went well, and as we won we shouldn't really change anything, although I would have tried to change these things anyway to make the cake even better. We wouldn't change the baking aspect as the cake pops taste suprisingly nice. We worked well as a team and I would work with Melissa again.


No comments:
Post a Comment